Streams of Blood (Ranked)
| Line 77: | Line 77: | ||
==Rush Tactics== | ==Rush Tactics== | ||
| − | + | {| | |
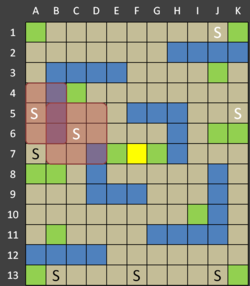
| − | + | | STYLE="vertical-align: center" align="left" |[[File:SOB Rush1.png|thumb|250px|Fig. 9: Spawn points]] | |
| + | | STYLE="vertical-align: center" align="left" |[[File:SOB Rush2.png|thumb|250px|Fig. 10: Rushing A7]] | ||
| + | | STYLE="vertical-align: center; text-align:justify;" align="right" | | ||
| + | | STYLE="vertical-align: center; text-align:justify;" align="right" | | ||
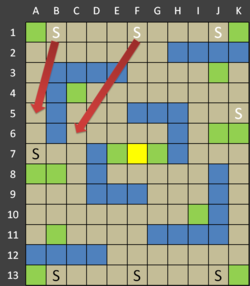
| + | While a blitz is designed to break a holding formation or a defensive line, a rush uses '''speed and surprise''' to overwhelm and/or cripple an enemy before they achieve effective buildup. The primary objective is to reduce the opponent's effectiveness <u>'''as early as possible'''</u>. A rush is nowhere as effective mid/late game, hence, the emphasis on speed and surprise. In SoB, there are two viable rush tactics: rushing the spawn point and rushing the victory terrain. <br /> <br /> <span style="color: limegreen">'''A7, K7'''</span>: Fig. 9 show the spawn positions in the SoB map. <span style="color: limegreen">'''A7'''</span> and <span style="color: limegreen">'''K7'''</span> represent two spawn positions in the enemy's half. With the right starting hand (eg: [[Cards/Sprint|Sprints]], [[Cards/Dash|Dashes]]) and turn advantage, one can easily isolate <span style="color: limegreen">'''A7/K7'''</span> in the early turns (see Fig. 10) leading to a kill and/or exert early lane pressure. The benefits of rushing the spawn points are two-fold. Firstly, the opponent's party effectiveness is drastically reduced by a third. Secondly, it puts pressure on the opponent forcing him to play defensively and/or make mistakes. However, rushing is not without risks. Once a rush is committed, your units are exposed and a veteran opponent is able to freely target your rushing units or develop a counter-rush strategy. <br /> <br /> <span style="color: limegreen">'''F7'''</span>: As of writing, SoB is the only map with <span style="color: orange">'''1'''</span> victory terrain. This means that it is possible to rush for victory stars. Such positional rushing aim to keep your opponent under early pressure through denial, dictating the arena of combat. If he ignores the unit camping the victory spot, he risks winning the battles and losing the war. If he engages the victory spot, he exposes his flanks to [[Streams_of_Blood(Ranked)#Offensive Map Control|pincers]] and/or ambushes. <br /> <br /> | ||
| + | |} | ||
==Crowd Control== | ==Crowd Control== | ||
Revision as of 00:51, 20 May 2013
|
|
Open terrain analysis: For each open terrain, count the number of adjacent open terrains. An open terrain has a minimum of 1 adjacent open terrain and a maximum of 8 open terrains.
The quantity signifies the number of open terrains with X adjacent open terrains. The distribution indicates the map difficulty in relation to movement.
Offensive Map Control
Choke Points and Pincers
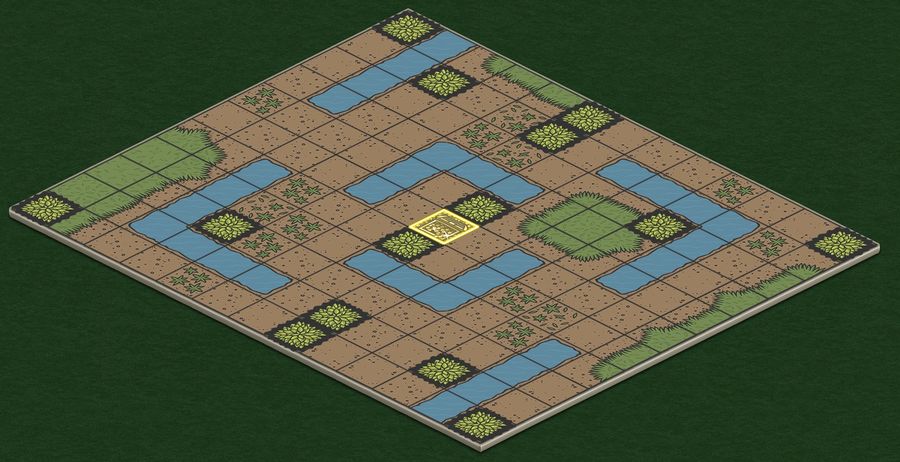
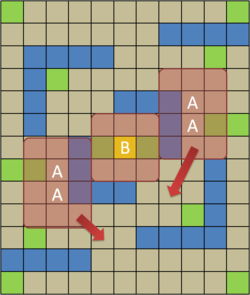
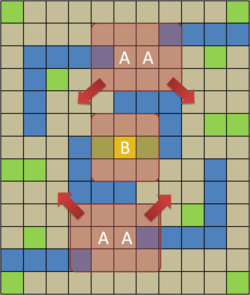
| Streams of Blood (SoB) is a PVP map containing 143 terrains with 1 victory terrain. There are no difficult terrains but a variety of narrow restrictive paths and four dead ends make SoB perilous to the unwary. All figures adopt the 'offensive force attacking downwards and opponent defending upwards' orientation. Narrow paths give rise to choke points and kill zones, forcing your opponent to seek meager cover provided by blocked terrains. Figs. 1 and 2 show the positions of various choke points in the map labelled as A and B. By occupying the various strategic points, opposing units are forced to fight on multiple fronts. Gradual pincer movements (as illustrated by the red arrows) squeeze the available pockets and entrap opposing units, making for quick easy kills. The primary difference between Figs. 1 and 2 lie in the victory terrain at B. When the map is split vertically, occupying B reduces the effectiveness of the choke point and pincer movement due to restricted line of sight. It can however be utilized as an ambush point for burst units equipped with Charge and step based attacks. Against the AI, SoB favors Amy's party of elves due to their natural Dash moves. An early Rockfall/Cave In combined with critical positioning and offensive attacks make short work of any party. |
Line of Sight
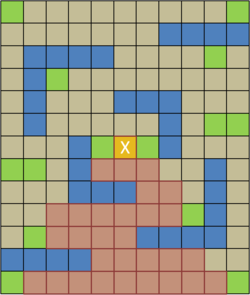
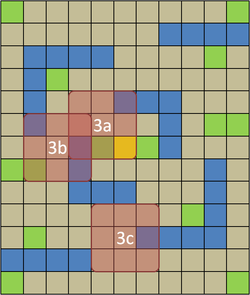
| Due to the lack of open terrains, line of sight is a precious commodity crucial for ranged units in SoB. As Fig. 3 shows, a unit represented by X occupying the victory terrain can see 58 open terrains fore and aft providing much needed firepower and support for melee units. For a map containing 97 open terrains, this represents more than half the map. In addition, the unit occupying X can take a step forward and increase its forward line of sight coverage while leaving the victory terrain in close proximity for easy recapture, an advantage easily exploitable via Dimensional Traveller. This makes the victory terrain a great spot to hold, defend, attack and support from. In the event that the victory terrain is already occupied, an alternative position that provides excellent line of sight is represented by X as shown in Fig. 4. This position provides a line of sight of 40 open terrains for the offensive force attacking downwards. Utilizing map symmetry, it is possible to install another ranged unit on the opposite side of the map, giving complete map coverage using only ranged units. Note that the effectiveness of these positions are highly dependent on possession of the victory terrain. If the victory terrain is in enemy hands, the opponent could simply use pincers (as shown in Fig. 2) to eliminate X. Be especially prudent and wary in capturing critical spots. |
Defensive Map Control
Defensive Positioning
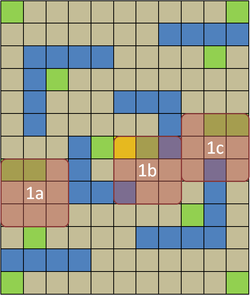
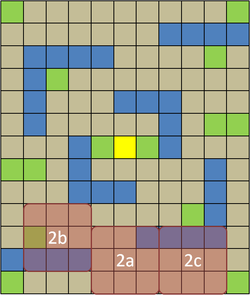
| Defensive map control is a risk averse approach to the game. It maximizes a party's effectiveness in combat through synergy and unit positioning, preventing flanking maneuvers and countering offensives. A basic tactic of defensive map control is defensive positioning utilizing available terrains, blind spots and ambush points to shut down the enemy. In SoB, the number of blocking terrains allow for easy defensive positioning both for melee and ranged units. 1a & 1c: Camping points for side lanes. Units attempting to flank or pincer (from the top) are slowed and vulnerable. Anvil Strikes become extremely deadly. Limited line of sight for ranged enemies. Combined with ranged support from 1b, these defensive positions form vertical pincers. 1b: Camping point for mid lane and victory square. Excellent spot behind cover that allows for multi-directional offensives, support and counters. Also useful for sniping victory square. Useful cards in hand to exert area of influence: Bashes, Force Bolts etc. 2a & 2b: Useful spots for ranged units to cover and attack enemy units attempting to infiltrate from the tri-lanes. Large field of view with overlaps, creating kill zones. Long range attacks combined with AOEs shut down enemy maneuvers. 2c: Sniper's spot, considered inferior to 2a & 2b as the range requirement is longer and does not provide alternative for advance. Combines well with Surging Bolts and Surging Blasts. |
Blitzkrieg
|
Blitzkrieg refers to a strategy that employs concentrating overwhelming force at high speed to break through enemy lines. In SoB, while offensive map control shuts down a party effectiveness quickly, it tends to spread units out due to multiple lane pockets. The defending party can choose to focus all attacks and blitz a single lane, thereby throwing the opponent into disarray. The blitz is also useful in creating lane pressure, forcing enemy units into giving up precious positions. |
Rush Tactics
|
While a blitz is designed to break a holding formation or a defensive line, a rush uses speed and surprise to overwhelm and/or cripple an enemy before they achieve effective buildup. The primary objective is to reduce the opponent's effectiveness as early as possible. A rush is nowhere as effective mid/late game, hence, the emphasis on speed and surprise. In SoB, there are two viable rush tactics: rushing the spawn point and rushing the victory terrain. |
Crowd Control
Coming Soon !
