A Tutorial to making custom scenarios
From Card Hunter Wiki
(Difference between revisions)
| Line 11: | Line 11: | ||
|[[File:Figure2.jpg|thumb|250px|Fig. 2: Setup Custom Scenario User Interface]] | |[[File:Figure2.jpg|thumb|250px|Fig. 2: Setup Custom Scenario User Interface]] | ||
|} | |} | ||
| + | |||
{| | {| | ||
| − | | STYLE="vertical-align: center; text-align:justify;" align="left" rowspan= | + | | STYLE="vertical-align: center; text-align:justify;" align="left" rowspan=2 colspan=2| We first start off by making a new board. Click on the '<span style="color: orange">'''Create'''</span>' button (Fig.3) to make a new board. Gary will prompt with a warning, click '<span style="color: orange">'''Continue'''</span>' to load the board editor. The board editor contains all tools required to make a custom board. We will not cover all functions of the editor in this guide. The interested reader is advised to explore and experiment at his/her own leisure. <br /><br /> First start off by clicking on the '<span style="color: orange">'''Table'''</span>' button in the top right Layers menu. The left portion of the editor now shows the Table Layer menu. This menu controls the table graphic. Toggle the default <span style="color: yellow">''MultiplayerTableIso.jpg''</span> to the <span style="color: yellow">''wooden_table.jpg''</span> and observe the change to the entire background. Congratulations ! You have successfully added a table layer. Well done ! <br /><br /> Next, let's lay down some tiles. Click on the '<span style="color: orange">'''Tiles'''</span>' button in the top right Layers menu. The leftmost menu now switches to a Tile Layer menu. Click on the <span style="color: orange">'''Tile Palette'''</span> to show all available tiles. Go to the dropdown menu on the right and click on it to activate the dropdown list. Choose <span style="color: yellow">''Forest''</span> to load the forest tile palettes (Fig. 5). Choose the <span style="color: yellow">''ForestGrass Random open''</span> tile by clicking on it. The palette menu will close and the mouse cursor now has the chosen tile attached. <br /><br /> Time to make the board ! Click anywhere to lay a tile. Continue until you have five by five forest terrains on the table (Fig. 6). If you have made a mistake anywhere, do not fret ! Click on '<span style="color: orange">'''Clear Brush'''</span> from the Tile Layer menu, open the tile palette again and choose the <span style="color: yellow">''Eraser''</span> (top leftmost) tile. Click over any unwanted tile to delete the forest. <br /><br /> After you are done laying down the forest tiles, it time to add in some obstacles ! Open the tile palette again, navigate to the forest tiles and click on <span style="color: yellow">''ForestBoulder Random Blocked''</span>. Drop the boulder tiles over any of the forest tiles. This creates blocked terrains in the board. Figure 7 shows a semi-completed five by five board terrain. |
|[[File:Figure3.jpg|thumb|350px|Fig. 3: Create a board]] | |[[File:Figure3.jpg|thumb|350px|Fig. 3: Create a board]] | ||
|- | |- | ||
| Line 19: | Line 20: | ||
|- | |- | ||
|[[File:Figure5.jpg|thumb|350px|Fig. 5: Forest Palette]] | |[[File:Figure5.jpg|thumb|350px|Fig. 5: Forest Palette]] | ||
| − | |||
|[[File:Figure6.jpg|thumb|350px|Fig. 6: Laying down tiles]] | |[[File:Figure6.jpg|thumb|350px|Fig. 6: Laying down tiles]] | ||
| + | |[[File:Figure7.jpg|thumb|350px|Fig. 7: Finishing the board]] | ||
|} | |} | ||
| + | {| | ||
| + | | STYLE="vertical-align: center; text-align:justify;" align="left" rowspan=2| We are close to finishing the custom board for good. Click on '<span style="color: orange">'''Lower Doodads'''</span>' in the Layers menu. Check the <span style="color: yellow">''Snap to grid''</span> option and <span style="color: yellow">''Place multiple''</span> option in the Lower Doodads Layer menu. Click on '<span style="color: orange">'''Place Doodad'''</span>' to display the lower doodad palette. Choose the board edge doodad (top row, third tile) and click on forest tiles on the edges to place lower doodads. Manually delete unwanted doodads using the '<span style="color: orange">'''Delete Doodads'''</span>' button. <br /><br /> Click on '<span style="color: orange">'''Spawns'''</span>' in the Layers menu. Click on <span style="color: orange">'''Player 0'''</span>, facing <span style="color: orange">'''North'''</span> in the Spawn Layer menu and click on a forest tile. A red circle with an orientation indicated by a straight line is shown over a tile. This sets the spawn point for the single character challenger. Since this is a single player challenge, there is only one Player 0 spawn. Click on Player 1, choose appropriate facing and click on three other forest tiles. These set the spawn points for the monsters. You can remove unwanted spawn points by clicking <span style="color: orange">'''None''' button and clicking over the offending spawn</span>. | ||
| + | |[[File:Figure8.jpg|thumb|350px|Fig. 8: Placing Lower Doodads]] | ||
| + | |- | ||
| + | |[[File:Figure9.jpg|thumb|350px|Fig. 9: Placing Spawn Points]] | ||
| + | |} | ||
Revision as of 00:54, 29 August 2013
Introduction
Custom scenarios are a feature of the Card Hunter game universe. Players are given free rein to design custom game boards with the board editor and setup scenarios to enjoy stress free tabletop-like games with friends or other players. You can play with your own multiplayer party or take on the role of monsters. Make escort missions or King of the Hill battle scenarios. Decimate countless mob waves or survive single character challenges. As of writing, custom scenarios support only single player vs AI and single player vs single player custom games. The custom scenario functionality is steadily growing and future work into co-operative modes and custom monsters are expected.
Building a simple custom board
| This guide introduces the steps required to making a simple custom scenario in Card Hunter. Custom scenarios are found in the Multiplayer Lobby when you click on the 'Create Custom Game' icon (Fig.1). After clicking on the icon, you will be presented with a user interface. Figure 2 shows the 'Setup Custom Scenario' user interface (CSUI). There are a multitude of settings and buttons in the CSUI. While it may look intimidating at first glance, in actual fact, it is fairly straightforward and simple to use. This tutorial will take the reader through board creation and scenario creation right up to playing a custom scenario with the AI. We first set off by designing the custom scenario in an outline form. What type of scenario to create: Single character challenge on open type board with some obstacles. What type of monsters to play against: Zombies ! What type of party to play with: Single character from the multiplayer party Time estimated to create the scenario: Not more than 30 minutes |
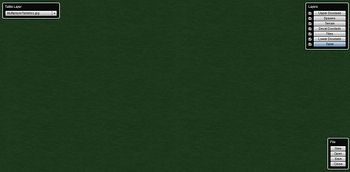
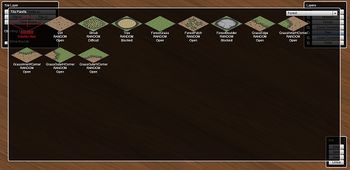
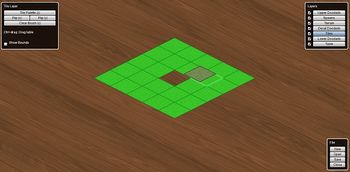
| We first start off by making a new board. Click on the 'Create' button (Fig.3) to make a new board. Gary will prompt with a warning, click 'Continue' to load the board editor. The board editor contains all tools required to make a custom board. We will not cover all functions of the editor in this guide. The interested reader is advised to explore and experiment at his/her own leisure. First start off by clicking on the 'Table' button in the top right Layers menu. The left portion of the editor now shows the Table Layer menu. This menu controls the table graphic. Toggle the default MultiplayerTableIso.jpg to the wooden_table.jpg and observe the change to the entire background. Congratulations ! You have successfully added a table layer. Well done ! Next, let's lay down some tiles. Click on the 'Tiles' button in the top right Layers menu. The leftmost menu now switches to a Tile Layer menu. Click on the Tile Palette to show all available tiles. Go to the dropdown menu on the right and click on it to activate the dropdown list. Choose Forest to load the forest tile palettes (Fig. 5). Choose the ForestGrass Random open tile by clicking on it. The palette menu will close and the mouse cursor now has the chosen tile attached. Time to make the board ! Click anywhere to lay a tile. Continue until you have five by five forest terrains on the table (Fig. 6). If you have made a mistake anywhere, do not fret ! Click on 'Clear Brush from the Tile Layer menu, open the tile palette again and choose the Eraser (top leftmost) tile. Click over any unwanted tile to delete the forest. After you are done laying down the forest tiles, it time to add in some obstacles ! Open the tile palette again, navigate to the forest tiles and click on ForestBoulder Random Blocked. Drop the boulder tiles over any of the forest tiles. This creates blocked terrains in the board. Figure 7 shows a semi-completed five by five board terrain. |
||
| We are close to finishing the custom board for good. Click on 'Lower Doodads' in the Layers menu. Check the Snap to grid option and Place multiple option in the Lower Doodads Layer menu. Click on 'Place Doodad' to display the lower doodad palette. Choose the board edge doodad (top row, third tile) and click on forest tiles on the edges to place lower doodads. Manually delete unwanted doodads using the 'Delete Doodads' button. Click on 'Spawns' in the Layers menu. Click on Player 0, facing North in the Spawn Layer menu and click on a forest tile. A red circle with an orientation indicated by a straight line is shown over a tile. This sets the spawn point for the single character challenger. Since this is a single player challenge, there is only one Player 0 spawn. Click on Player 1, choose appropriate facing and click on three other forest tiles. These set the spawn points for the monsters. You can remove unwanted spawn points by clicking None button and clicking over the offending spawn. |
|
Credits
Phaselock: Author of this guide.


