Temple Tussle (Ranked)
From Card Hunter Wiki
(Difference between revisions)
| Line 55: | Line 55: | ||
===Line of Sight=== | ===Line of Sight=== | ||
| − | |||
| − | |||
{| | {| | ||
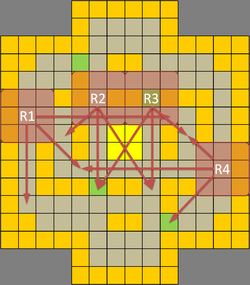
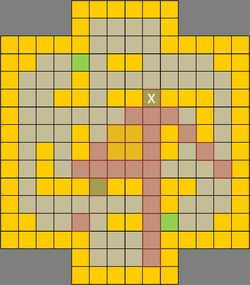
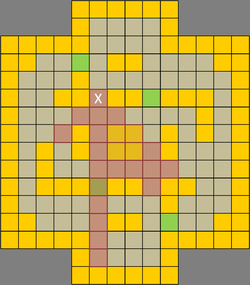
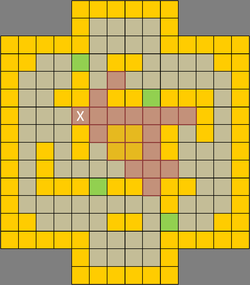
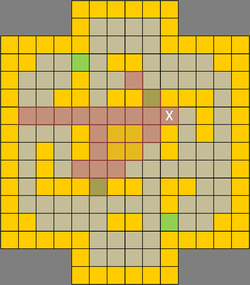
| − | | STYLE="vertical-align: center; text-align:justify;" align="left" | | + | | STYLE="vertical-align: center; text-align:justify;" align="left" colspan=4 | Due to the many mazes and narrow lanes, line of sight (LoS) is a precious commodity crucial for ranged units in TT. The most valuable LoS are those that found in the eight lanes leading into the victory terrain (c.f. Figure 1 above). With map symmetry in mind, only four spots (paths 1, 2, 3 and 4) are discussed. Figures 5 to 8 below show the different areas of coverage.<br /><br /> Of the various points, the LoS at path 3 (Fig. 5) denoted by <span style="color: limegreen">'''X'''</span> covers <span style="color: orange">'''25'''</span> squares which is the maximum compared to other lane spots. In addition, the underlying square has [[Game_Terrain#Difficult_Terrain|difficult terrain]], making it a great sniper's spot and a perfect place to launch an offensive from. A ranged unit can simply back away when enemy melee units attempt to close in or lay down [[Cards/Wall of Fire|lava terrain]] to deter aggressors. A melee unit can choose to dominate the victory terrain or attempt to close down the right lane. [[Cards/Charge|Charging]] dwarves can pick any three lanes for rapid penetration. The sole drawback is a possible flanking move from the left lane and a single blindspot from the right. Figures 6 to 8 show the LoS of other paths. All provide sufficient coverage of the victory terrains and any two combinations are sufficient for creating overlapping kill zones. |
| − | | | + | |- |
| − | | | + | | [[File:TT_LoS1.png|thumb|250px|Fig. 5: Line of Sight at path 3]] |
| + | | [[File:TT_LoS2.png|thumb|250px|Fig. 6: Line of Sight at path 2]] | ||
| + | | [[File:TT_LoS3.png|thumb|250px|Fig. 7: Line of Sight at path 1]] | ||
| + | | [[File:TT_LoS4.png|thumb|250px|Fig. 8: Line of Sight at path 4]] | ||
|} | |} | ||
Revision as of 00:43, 27 May 2013
Contents |
Temple Tussle Map Analysis
|
| ||||||||||||||||||||||||||||||||||
| Open terrain analysis: For each open terrain, count the number of adjacent open terrains. An open terrain has a minimum of 1 adjacent open terrain and a maximum of 8 open terrains. The quantity signifies the number of open terrains with X adjacent open terrains. The distribution indicates the map difficulty in relation to movement. | |||||||||||||||||||||||||||||||||||
Offensive Map Control
The Eight Paths
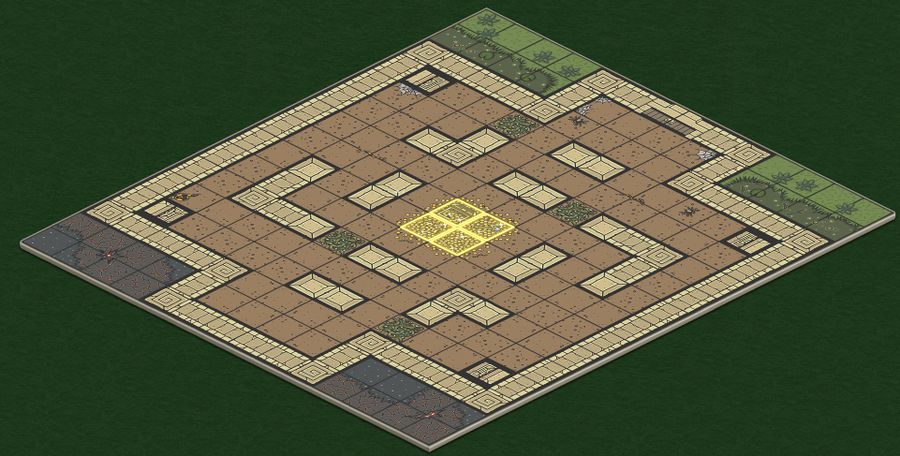
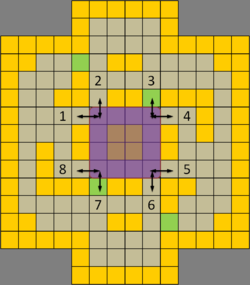
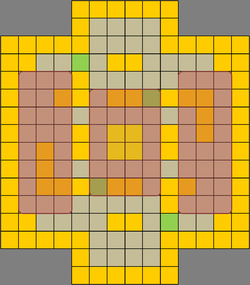
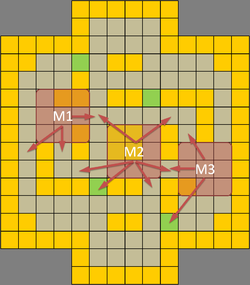
| Temple Tussle (TT) is a PVP map containing 224 terrains with 4 victory terrains. There are no impassable terrains and 4 difficult terrains. A central open 4x4 contest zone is surrounded on four sides by mini-mazes, creating a 'King of the Hill' (KotH) scenario. All figures adopt the 'offensive force attacking downwards and opponent defending upwards' orientation. As in usual KotH-like arenas, offensive control is established by winning areas leading into and out of the victory zone. As Figure 1 shows, there are 8 paths connected to the victory squares (highlighted in purple). Two paths involve difficult terrains, suited for ranged units. Whichever party successfully controls these pathways controls the game. However, it is impossible for a single party of 3 to simultaneously occupy 8 positions. Instead, we split the map into 3 distinctive zones and place units within those regions (Fig. 2) to cover as many paths as possible. By doing so, the map is set up for pincers and overlapping kill zones while allowing free flowing movement designed to punish isolated enemy units. Figure 3 show desirable positions that allow a team of melee units (attacking downwards) to exert map control on the opponent. M1 block enemies attempting to penetrate from the left lane while M3 block enemies from the right. M2 supports M1 and M3 by forming pincers and if need be, choke points to completely shut down enemy maneuvers into the lanes. Figure 4 show the same for a team of ranged units. Unlike melee units, ranged units set up overlapping kill zones to cover units attempting to penetrate the lanes and the victory terrains. Hence, the use of width and a higher strategic line of offense. Note that designations merely show preferable positions. In practice, hybrid teams work best to exert map control by covering each other with flexible positioning. | |||
Line of Sight
| Due to the many mazes and narrow lanes, line of sight (LoS) is a precious commodity crucial for ranged units in TT. The most valuable LoS are those that found in the eight lanes leading into the victory terrain (c.f. Figure 1 above). With map symmetry in mind, only four spots (paths 1, 2, 3 and 4) are discussed. Figures 5 to 8 below show the different areas of coverage. Of the various points, the LoS at path 3 (Fig. 5) denoted by X covers 25 squares which is the maximum compared to other lane spots. In addition, the underlying square has difficult terrain, making it a great sniper's spot and a perfect place to launch an offensive from. A ranged unit can simply back away when enemy melee units attempt to close in or lay down lava terrain to deter aggressors. A melee unit can choose to dominate the victory terrain or attempt to close down the right lane. Charging dwarves can pick any three lanes for rapid penetration. The sole drawback is a possible flanking move from the left lane and a single blindspot from the right. Figures 6 to 8 show the LoS of other paths. All provide sufficient coverage of the victory terrains and any two combinations are sufficient for creating overlapping kill zones. | |||
Defensive Map Control
Defensive Positioning
Coming Soon !
Coming Soon !
Crowd Control
Coming Soon !
