Movement
| Line 4: | Line 4: | ||
{| | {| | ||
| − | | STYLE="vertical-align: center; text-align:justify;" align="left" | A move comprises two components: move points and an orientation. Move points refer to the number of [[Game Terrain#Open terrain|open terrains]] that a character can move across. For example, [[Cards/Walk|walk]] contains two move points (denoted by the little boot icon and the number 2 in the lower left corner of the card). Any character that plays [[Cards/Walk|Walk]] is allowed to move across two [[Game Terrain#Open terrain|open terrains]], assuming no obstacles are in its way. The orientation of the character at the end of its move is determined by the direction of the move. Figure 2 shows a dwarf wizard with its [[Cards/Walk|Walk]] preview. The tiles with a blue overlay show the possible moves if the player decides to play [[Cards/Walk|Walk]]. The arrows in blue show the orientation of the dwarf wizard if he so chooses to move to the tile. If the player chooses to move the dwarf left, it will orient itself facing leftwards at the end of its move. Therefore fleeing from enemies usually exposes your character's back towards your enemy. ''Note: Movement is heavily influenced by underlying terrain. While this guide does not cover movement in relation to terrain, the reader is advised to browse the [[Game Terrain]] basic guide.'' | + | | STYLE="vertical-align: center; text-align:justify;" align="left" | A move comprises two components: move points and an orientation. Move points refer to the number of [[Game Terrain#Open terrain|open terrains]] that a character can move across. For example, [[Cards/Walk|walk]] contains two move points (denoted by the little boot icon and the number 2 in the lower left corner of the card). Any character that plays [[Cards/Walk|Walk]] is allowed to move across two [[Game Terrain#Open terrain|open terrains]], assuming no obstacles are in its way. The orientation of the character at the end of its move is determined by the direction of the move. Figure 2 shows a [[Wizard|dwarf wizard]] with its [[Cards/Walk|Walk]] preview. The tiles with a blue overlay show the possible moves if the player decides to play [[Cards/Walk|Walk]]. The arrows in blue show the orientation of the dwarf wizard if he so chooses to move to the tile. If the player chooses to move the dwarf left, it will orient itself facing leftwards at the end of its move. Therefore fleeing from enemies usually exposes your character's back towards your enemy. ''Note: Movement is heavily influenced by underlying terrain. While this guide does not cover movement in relation to terrain, the reader is advised to browse the [[Game Terrain]] basic guide.'' |
| [[File:Walk.jpeg|thumb|150px|Fig. 1: The Walk card]] | | [[File:Walk.jpeg|thumb|150px|Fig. 1: The Walk card]] | ||
| [[File:Basic_walk.jpg|thumb|350px|Fig. 2: A dwarf wizard with walk preview]] | | [[File:Basic_walk.jpg|thumb|350px|Fig. 2: A dwarf wizard with walk preview]] | ||
| Line 11: | Line 11: | ||
==Zone of Control (ZoC)== | ==Zone of Control (ZoC)== | ||
| − | Zone of control refers to an in-game rule that forces opponents to stop when moving next to an enemy. This rule stops you from just using a single move card to whip behind an enemy. It helps tanks and other defensive characters “hold the line” and prevent enemies breaking through to your casters or healers behind. It also makes it hard for opponents to stab you in the back, where you can’t counter-attack or defend. When approaching enemies or fleeing from them, use movement previews to decide strategically the desired placement of your character against your enemy. | + | Zone of control (ZoC) refers to an in-game rule that forces opponents to stop when moving next to an enemy. This rule stops you from just using a single move card to whip behind an enemy. It helps tanks and other defensive characters “hold the line” and prevent enemies breaking through to your casters or healers behind. It also makes it hard for opponents to stab you in the back, where you can’t counter-attack or defend. When approaching enemies or fleeing from them, use movement previews to decide strategically the desired placement of your character against your enemy. |
| − | + | {| | |
| + | | STYLE="vertical-align: center; text-align:justify;" align="left" | Figure 3 shows a movement preview of a [[Warrior|human warrior]] with the [[Cards/Run|Run]] cards facing off against a war monkey. The blue overlays in the tiles around the war monkey show a deeper shade of blue compared to the rest of the preview. These tiles illustrate the ZoC of the war monkey. If the human warrior plays [[Cards/Run|Run]] and moves directly forward, he must move one tile and stop facing the war monkey. The use of the [[Cards/Run|Run]] card is equivalent to that of a [[Cards/Shuffle|Shuffle]]. Such a move would be a poor use of [[Cards/Run|Run]]. <br /><br /> Figure 4 shows the movement preview of the same human warrior a turn later. Several other war monkeys have managed to surround the human warrior in a triangular configuration. Such a move flanks a single character on all sides and ensures that a war monkey is able to target the warrior from behind. The warrior's possible moves are also severely constrained as he is now boxed in by each monkey's ZoC. By understanding ZoC, the board's [[Game Terrain|various terrains]] and strategic positioning, it is possible to maximize movement advantage to eliminate minion threats, especially when the numbers are in your favor. | ||
| + | | [[File:ZOC.jpg|thumb|300px|Fig. 3: Zone of control example]] | ||
| + | | [[File:ZOC1.jpg|thumb|300px|Fig. 4: Zone of control boxing in a character]] | ||
| + | |} | ||
==The Default Move Card== | ==The Default Move Card== | ||
| Line 20: | Line 24: | ||
{| | {| | ||
| − | | STYLE="vertical-align: center; text-align:justify;" align="left" | But move cards aren’t gone from the deck building part of the game either. It’s still highly advantageous to have more movement than the default – if you are the kind of character who can take advantage of it. Rogues and tricky warriors will often want to have more move cards to get into good tactical positions. Even wizards might want some extra moves to get away from melee attackers. Movement is absolute key to this game. It’s easy to start loading up on big attacks and spells, but all those are meaningless if your opponent can maneuver to make them unplayable or ineffective. You get extra move cards from items you equip on your characters. Such item based move cards are not visible until played. Figure | + | | STYLE="vertical-align: center; text-align:justify;" align="left" | But move cards aren’t gone from the deck building part of the game either. It’s still highly advantageous to have more movement than the default – if you are the kind of character who can take advantage of it. Rogues and tricky warriors will often want to have more move cards to get into good tactical positions. Even wizards might want some extra moves to get away from melee attackers. Movement is absolute key to this game. It’s easy to start loading up on big attacks and spells, but all those are meaningless if your opponent can maneuver to make them unplayable or ineffective. You get extra move cards from items you equip on your characters. Such item based move cards are not visible until played. Figure 5 shows three [[Cards/Run|run]] cards in hand, two of which are default move cards. The first [[Cards/Run|run]] is from an item and is not visible to your opponent. Such cards are different from the default moves and therefore play a huge strategic role in the game. <br /><br /> Your default move card is determined by your character's race. The dwarf’s default move card is the clunky [[Cards/Walk|Walk]] card, humans get the average [[Cards/Run|Run]] and elves get the extremely useful [[Cards/Dash|Dash]] card. Default move cards will show the race of the character in the [[Cards#Information Bar|information bar]]. |
| − | | [[File:Differentiate_run.jpg|thumb|450px|Fig. | + | | [[File:Differentiate_run.jpg|thumb|450px|Fig. 5: Move card from equipment vs the default move cards. Note the eye symbols]] |
| − | | [[File:Run_human.jpg|thumb|150px|Fig. | + | | [[File:Run_human.jpg|thumb|150px|Fig. 6: Default run for humans]] |
|} | |} | ||
Revision as of 06:13, 31 May 2013
Movements are a core element of strategic Card Hunter gameplay. In Card Hunter, you play move cards to move your characters. Without move cards in hand, even a party of hardcore warriors are reduced to nothing more than sitting ducks. This guide covers basic concepts of movement, a character's zone of control, default move cards and commonly encountered keywords associated with move cards. As moves are intricately tied with game terrains, readers are advised to browse the Game Terrain basic guide as a prelude.
Contents |
Basic Movement
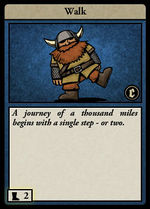
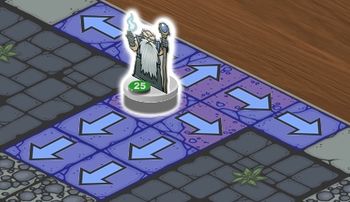
| A move comprises two components: move points and an orientation. Move points refer to the number of open terrains that a character can move across. For example, walk contains two move points (denoted by the little boot icon and the number 2 in the lower left corner of the card). Any character that plays Walk is allowed to move across two open terrains, assuming no obstacles are in its way. The orientation of the character at the end of its move is determined by the direction of the move. Figure 2 shows a dwarf wizard with its Walk preview. The tiles with a blue overlay show the possible moves if the player decides to play Walk. The arrows in blue show the orientation of the dwarf wizard if he so chooses to move to the tile. If the player chooses to move the dwarf left, it will orient itself facing leftwards at the end of its move. Therefore fleeing from enemies usually exposes your character's back towards your enemy. Note: Movement is heavily influenced by underlying terrain. While this guide does not cover movement in relation to terrain, the reader is advised to browse the Game Terrain basic guide. |
Zone of Control (ZoC)
Zone of control (ZoC) refers to an in-game rule that forces opponents to stop when moving next to an enemy. This rule stops you from just using a single move card to whip behind an enemy. It helps tanks and other defensive characters “hold the line” and prevent enemies breaking through to your casters or healers behind. It also makes it hard for opponents to stab you in the back, where you can’t counter-attack or defend. When approaching enemies or fleeing from them, use movement previews to decide strategically the desired placement of your character against your enemy.
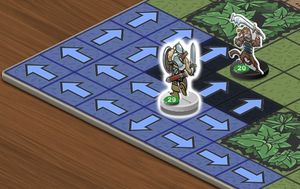
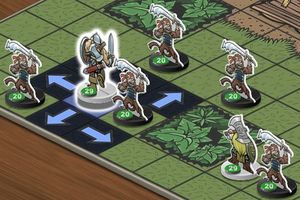
| Figure 3 shows a movement preview of a human warrior with the Run cards facing off against a war monkey. The blue overlays in the tiles around the war monkey show a deeper shade of blue compared to the rest of the preview. These tiles illustrate the ZoC of the war monkey. If the human warrior plays Run and moves directly forward, he must move one tile and stop facing the war monkey. The use of the Run card is equivalent to that of a Shuffle. Such a move would be a poor use of Run. Figure 4 shows the movement preview of the same human warrior a turn later. Several other war monkeys have managed to surround the human warrior in a triangular configuration. Such a move flanks a single character on all sides and ensures that a war monkey is able to target the warrior from behind. The warrior's possible moves are also severely constrained as he is now boxed in by each monkey's ZoC. By understanding ZoC, the board's various terrains and strategic positioning, it is possible to maximize movement advantage to eliminate minion threats, especially when the numbers are in your favor. |
The Default Move Card
Each character has a default move card. Each round, when you draw your cards, in addition to the two cards you draw from your deck, you get a new copy of your default move card for free, so you end up drawing three cards, one of which is guaranteed to be a move card. Because the default move card isn’t a regular part of your deck, you don’t have to put any move cards in your deck at all – reducing the possibility of move flood as well as eliminating move screw. And since its a default free card drawn every round, this card is always visible (denoted by the eye symbol) to your opponents.
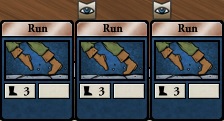
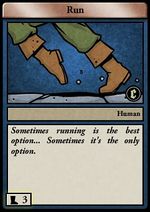
| But move cards aren’t gone from the deck building part of the game either. It’s still highly advantageous to have more movement than the default – if you are the kind of character who can take advantage of it. Rogues and tricky warriors will often want to have more move cards to get into good tactical positions. Even wizards might want some extra moves to get away from melee attackers. Movement is absolute key to this game. It’s easy to start loading up on big attacks and spells, but all those are meaningless if your opponent can maneuver to make them unplayable or ineffective. You get extra move cards from items you equip on your characters. Such item based move cards are not visible until played. Figure 5 shows three run cards in hand, two of which are default move cards. The first run is from an item and is not visible to your opponent. Such cards are different from the default moves and therefore play a huge strategic role in the game. Your default move card is determined by your character's race. The dwarf’s default move card is the clunky Walk card, humans get the average Run and elves get the extremely useful Dash card. Default move cards will show the race of the character in the information bar. |
